
I originally intended this 11.33 to be an Iwagumi inspired tank, but the rocks I had for the tank weren’t right for Iwagumi. Iwagumi uses rocks/stones as the basis of the structure, sort of like a skeleton. The rock I wanted to use broke into rather roundish pieces, making it hard to have any jutting pieces. It also made it hard to find ways to position the rocks near each other. So I had to pick between scrapping the beautiful white marble I’d found in my backyard or try to find a way to use it effectively. I’m not entirely sold on how the tank has come out; I expect there to be some major changes or re-scapes in the future.
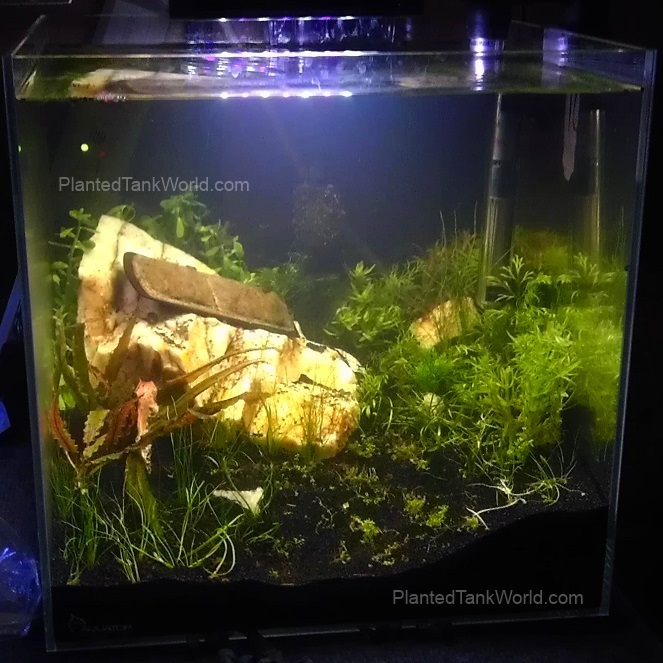
11.3 Gallon – Day 1 – That’s the filter insert on the large rock.
Initial Tank Setup Process
- Gear: Placing the filter intake and outflow along with the heater can affect the balance of a tank. I usually get all of the “gear” ready beforehand to make sure it all will work and electrical cords will reach. Then I see how intrusive the submerged elements will be. You can plant and prepare the tank with these in place (but not running yet) or without them.
- Soil Layer: Mix prepared Miracle-Gro Organic Choice Potting Mix with conditioned water to make mud. Spread a 1″ layer, pressing it down gently to remove an air pockets. This layer cushions the rocks.
- Rock Layout: Place stones/rocks on top of soil layer. Mine had obvious cleavage/fracture lines, which I pointed in the same direction for each rock. I tried to create a valley of sorts toward the right side of the tank, having the far end of the valley be the vanishing point.
- Substrate: Add enough soil to seat the rocks comfortably and create an upward slant toward the back of the tank. Then cap the soil with sand. I used CaribSea Tahitian Moon Sand, but a few weeks later I added a mini layer of black CaribSea Eco-Complete to tone down the substrate. I chose black to offset the white rocks I chose and bring out colors in the planned tank inhabitants.
- Water: Add enough conditioned water to soak the entire substrate. Due to the slanting, there was about an inch of water above the substrate in the front. Pour water slowly and direct it onto a plate or piece of plastic to protect the substrate.
- Planting: I used mostly scraps from other tanks for this one. Initially I planted dwarf hairgrass, microsword, and others – see the diagram below. Plant everything deep enough to keep it anchored. I recommend using fine tweezers to reduce substrate movement during planting.
- Fix-up Sand Layer: Planting a Walstad bring soil up to the surface, so add additional sand where needed to cover soil and fill any tweezer holes.
- Water: Fill the tank slowly and, again, pouring onto a barrier to protect the substrate. Use water from an established, healthy tank if you can.
- Gear/Cycling: Turn on the heater and filter. I always seed my filters with media from established tanks. In addition to the HOB with cycled filter pads, I also placed a filter insert on one of the rocks below the filter outflor. It was too big to fit in the HOB and looked rather gross, but it definitely helped the tank cycle almost instantly.
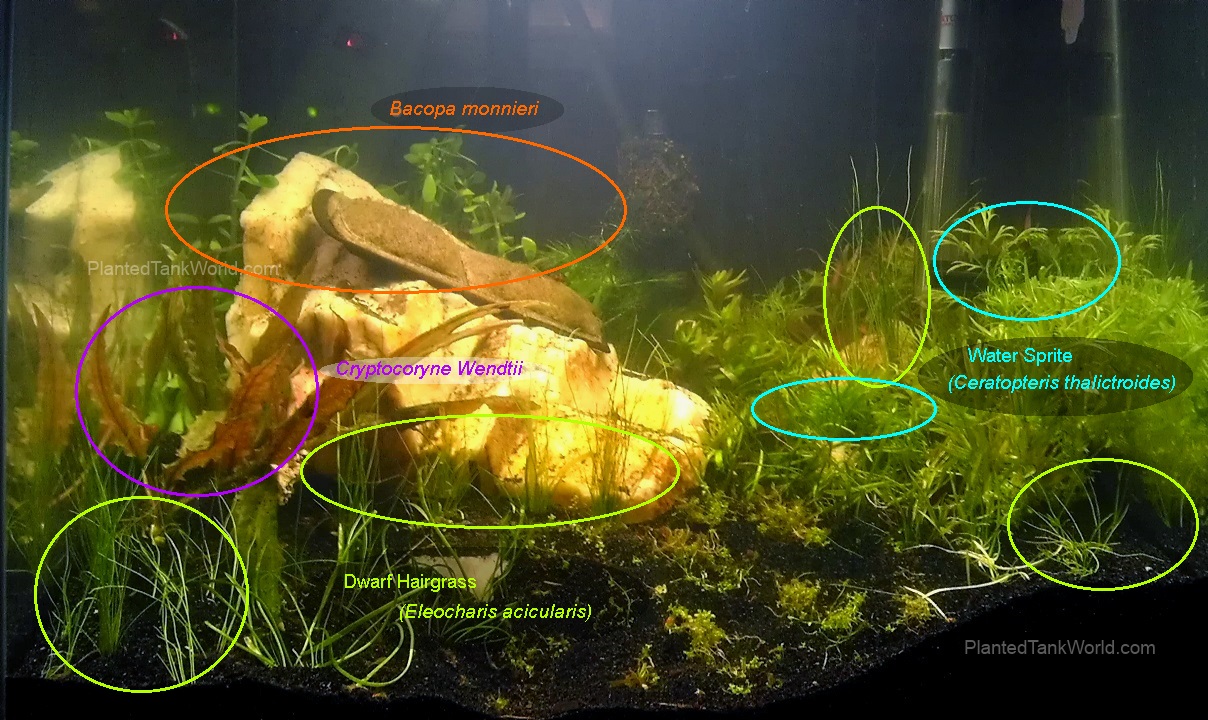
Here are all of the names of the plants I used, labeled in the images below.
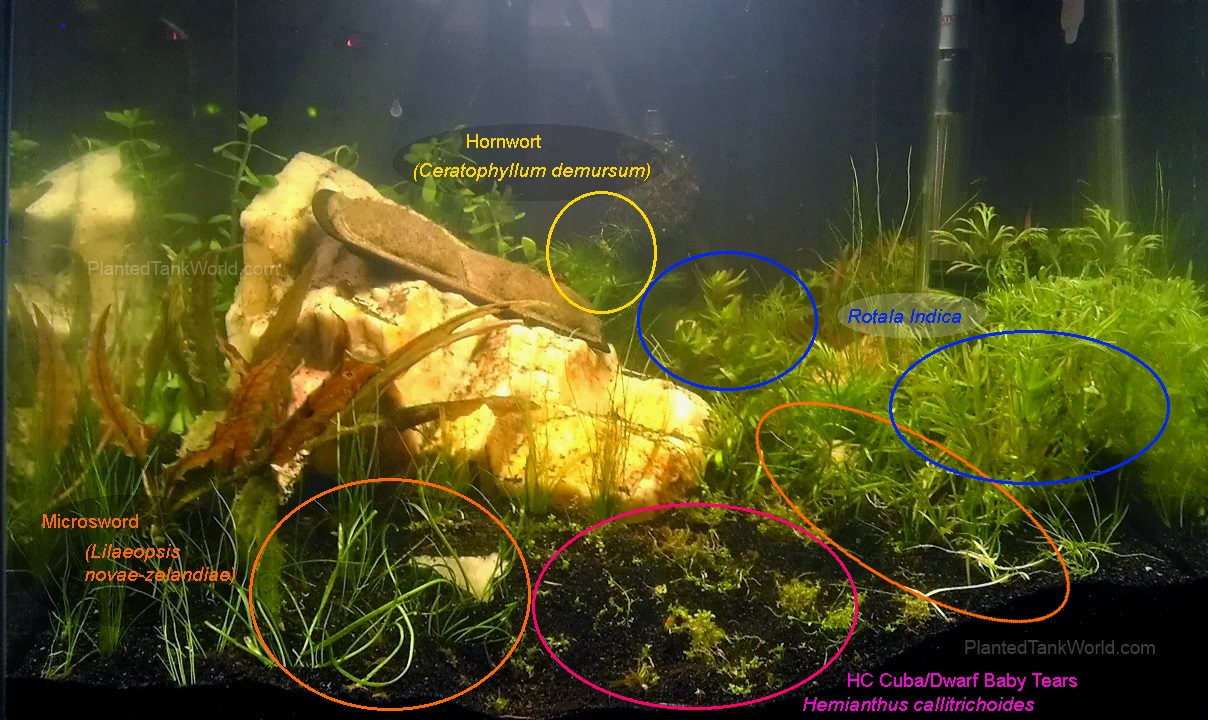
Hornwort/Coontail (Ceratophyllum demursum)
Cryptocoryne wendtii
Water Sprite/Indian Fern (Ceratopteris thalictroides)
Bacopa monnieri
Dwarf Hairgrass (Eleocharis acicularis)
Rotala indica
Microsword/Copragrass (Lilaeopsis novae-zelandiae)
HC Cuba/Dwarf Baby Tears (Hemianthus callitrichoides)
