I finally got around to starting my the final tank from my Aquatop rimless tank splurge from a while back. Using riverscapes as my inspiration, I wanted to create a quite stream dividing a forest from a field. Here was my process for the initial setup of this tank:
1. Collect Supplies
I took a trip to a local landscaping supply company to find some nice looking rocks for the stream bed. Using two sizes of gravel, with smaller pieces in the back and larger pieces in the front, can make a tank look much deeper than it really is. I wish I had gone with substrate that matched the rock color, or perhaps I’ll try covering the entire tank with fine grained substrate matching the steam’s rocks in the future.
Except for plants, all the remaining supplies (heater, filter, lights, substrate, driftwood, moss) were already accounted for. I found some 50% off plants at my local Petsmart that looked salvageable – crypts and small swords seemed like a good start.
2. First Layer – Soil

Soil Base – Ideal consistency is thick mud. I added too much water here.
I used Miracle-Gro Organic Choice Potting Mix for this layer. I added too much water, creating more of a soup than the intended thick mud. Picking out the larger pieces of wood is fairly easy at this point and highly recommended.
3. Soil cap

Second Layer – Soil Cap
This layer keeps the soil in place and gives waste a route to the bacteria in the soil. Medium grain works well, if not larger. Size depends on the intended top layer of the substrate – the larger particle grains will tend to rise to the top if disturbed.
3. Basic landscaping
 This step would have been much easier if I hadn’t overdone the water in the first step. If the soil is properly moistened trenches or other depressions in the landscape will not flood with muddy water. I dug a trench for the the stream rocks and angled the substrate up toward the back, dipping in to meet the stream.
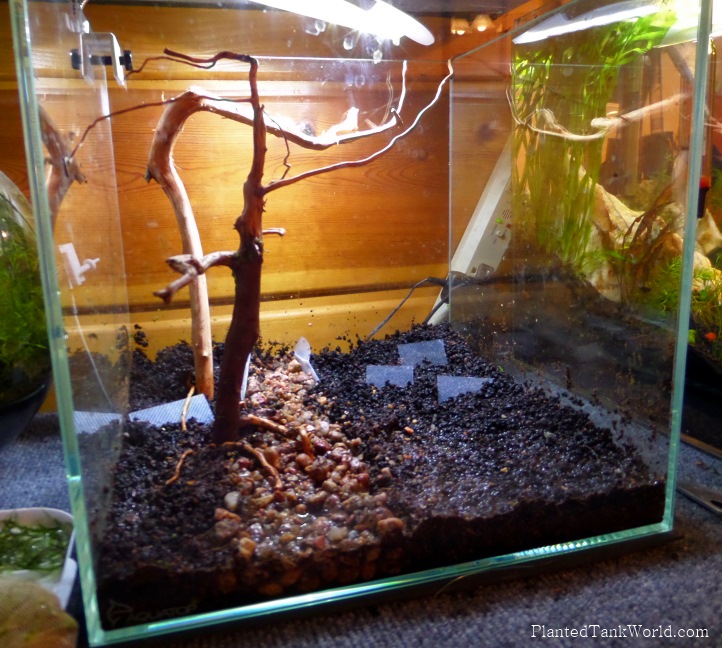
4. Hardscape

Step Four – Add in hardscape (large rocks, wood, etc) and substrate support
I added the stream rocks first, with larger pieces in the front and smaller ones in the back. Then I positioned the two “trees” next to the stream, using spare pieces of the wood for root structures. To help keep the substrate height taller toward the back of the tank, I added thin pieces of hard plastic. Pieces of reusable plastic containers, plastic milk cartons, or such work well for this, so long as they are clean and will not degrade or leach chemicals into the tank. These pieces should be added so they tilt with the incline, while still remaining close to vertical. Angling too much makes planting and holding soil back difficult. Plain vertical pieces tend to be visible in the tank rather than staying buried under the top layer of substrate.
5. Final Substrate Layer

Step Five – Final substrate layer and landscaping adjustments
Adding this last layer of substrate was made much harder by using too much for from the first step. It should be evenly spread over the previous layer, with some deviations to correct the intended landscape. This layer also tucks in the hardscape.
6. Planting

Crypts – Split apart to leave each portion with intact roots

First batch of plants in

Riccia andd java moss nets on the right

Crypts and Swords and Moss, Oh My!!!
I planted much more heavily along the left side of the tank, which will hopefully grow into a thick forest of leaves and tall greens. I put the swords in the far back and crypts in front of them along the entire back. I might move the plants on the right if I can’t maintain them as short as I’d like. The right side has three netted mats. The two larger have riccia fluitans, and the other has moss. This should grow up through the netting, creating a carpet. I’ll be posting on how I made these mats soon!
7. Filling – SLOWLY
I used a weak pump to add the first few inches of water slowly. Whenever I’ve tried to pour water, even using baffles or such, I always wind up stirring up far more dirt than intended. The pump is older, sufficing only for this and drip acclimation for the most part. Once the first few inches were added (still super clear!), I switched to a basic siphon system. Since the tank is up on a stand, I had to stack the water bucket high enough to be above the tank, as seen in some of the photos above. In both bases, I had the water entering the tank on top of the stream gravel to avoid stirring up substrate. Unfortunately, I did have an accident while switching between systems, causing a plume of dust to enter the water column.
8. Equipment, Waiting, and Water Changes
Once the tank is full, the equipment can be added and turned on to begin filtering and maintaining the tank temperature. At this point, there’s not much more to do than wait for the dust to settle and perform a few water changes. I usually do daily water changes until the tank is clear, and I use pre-seeded filter media to avoid waiting the usual month or so for the tank to cycle.
I’ll post an update once the tank is clear and the plants have begun to acclimate. I hope it turns out well!